Tuesday, April 24, 2012

Coat Rack


  Now that we have a bench for the mud room, Tracy and I thought we should have a place to hang our coats.  I had a piece of 1 X 4 left over from building the X Bench. I also had 4 hooks left from a project I had built a couple of years ago.


  Tracy had gone to Iowa City to be with Steph, Michael and Brynlee. Steph was not feeling well and they needed a little help.

  The plan was to do a little router work on the board, stain to match the bench, and hang it all before Tracy returned in a couple days.

  When I started to do the router work on the board, it all went wrong, the side split out and the board was ruined


  Luckily I had an 8ft piece of 1 X 4. I just cut a new one and started over. I  pre-drilled my holes and put the first coat of stain on the next day.


   It was almost a week later than I had planned, but the coat rack is finished and mounted. With the bench  and coat rack our mud room is now complete.


Tuesday, April 17, 2012

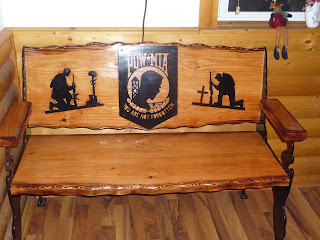
Military Honor Bench

  Wow, what a wonderful bench.  This bench was made by my friend Todd and his wife Judy. Todd is a metal Fabricator, so doing the metal work was a breeze for him. His neighbor did the router work on the wood to inset the metal soldiers.

  The 2 soldiers and the  POW-MIA symbol are made out of steel. They were cut on a High Definition Plasma table. They were then cleaned, and painted black. ( I believe Judy does all the painting and finishing work.)


This bench is proudly displayed in the entry way at Todd and Judy's home

Todd is also a proud Army Veteran.


Thursday, April 12, 2012

Rustic X Bench

  Tracy and I needed a small bench in the mud room, I made an X bench so we would have a place to sit while taking our shoes off. 


  I received a pocket hole jig for Christmas and this was a great chance to use it. Pocket holes are a great way to hide the screws. They are also one of the easiest and strongest joints you can make.


  I put a 5 degree taper on the legs to give a nice base with plenty of support.


  With a router I put a nice edge on the seat of our bench


  All that was left to do was sand and finish the bench, I put 2 coats of Minwax one step stain and polyurethane. Here are some additional pictures.


  Here are the dimensions of the bench, I used the plans from Ana White.

This is the finished bench 


Below is the picture from the Pottery Barn web site,  Rustic bench that sells for $129.00.

I made my bench for less than $20.00


Sunday, April 8, 2012

Counter Top Transformation

Check out the difference that $70.00 and a weekend has made in my son Matt and his wife Brooke's kitchen.


I was very impressed with the counters at Matt and Brooke's house. This transformation was completely done by my daughter - in-law Brooke.  Instead of buying new counter-tops they resurfaced the tops they had.

Tracy had read about a product called Giani Granite that would make plain counter-tops look like granite, knowing that Brooke wanted to redo their kitchen she told Brooke about it.

Brooke and Matt found the product at their local Walmart for $70.00
1st Step:  Brooke applied the a coat of the black base to the entire counter and let it dry overnight

2nd Step: There are 3 different colors that need to be applied in 3ft square areas until the entire counter-top is covered. Allowing each color to dry before adding the next color.


This is what it looked like when all colors were applied and dry.


3 rd Step:  There is a clear coat to add over the entire counter-top as the final step. It needs to dry for 8 hours prior to sitting anything onto the counter. It will take about 7 days for the clear coat to be fully cured.


What an unbelievable change in their kitchen for only $70.00 and a weekend of time. Very Proud of the job they have done. I guess the next generation of DIY has begun.