Saturday, May 26, 2012

Inspired Bank


 This bank was built for my grand-daughter Brynlee. It was inspired by my late Uncle Hobart. A  couple of years ago Tracy and I were visiting my Aunt Mary Louise and she showed me a box that Hobart had made. Mary Louise told the story of how they had bought all the doors from an old post office box. The box itself was made from solid walnut that was from a tree that was cut down at their farm in Ottumwa. I must say it was beautiful. She then told us about how Hobart had made a box for their son Steve and one for each of their grandchildren. With having all of the PO Box doors, he used the original door # for the year each of the children were born.

  The day we were there Mary Louise gave me 10 of the PO Box doors. Hopefully, my banks will bring the same joy to my grandchildren as I'm sure Hobart's boxes did for his.

  Not having an old tree that needed to be cut down this is what I have decided to do. Brynlee's bank is made from the drop wood from the X Bench  I built earlier this year and is in our house. I had to take some pieces and glue them together in order to get large pieces for the sides and back. I have a small box that I have been saving and marking the small drops of wood, as to what project they are from. This will allow me to be able to identify where the wood comes from for future banks. I plan to continue with Hobart's idea and make a bank for each of my grandchildren,
(at least the first 10).


Tuesday, April 24, 2012

Coat Rack


  Now that we have a bench for the mud room, Tracy and I thought we should have a place to hang our coats.  I had a piece of 1 X 4 left over from building the X Bench. I also had 4 hooks left from a project I had built a couple of years ago.


  Tracy had gone to Iowa City to be with Steph, Michael and Brynlee. Steph was not feeling well and they needed a little help.

  The plan was to do a little router work on the board, stain to match the bench, and hang it all before Tracy returned in a couple days.

  When I started to do the router work on the board, it all went wrong, the side split out and the board was ruined


  Luckily I had an 8ft piece of 1 X 4. I just cut a new one and started over. I  pre-drilled my holes and put the first coat of stain on the next day.


   It was almost a week later than I had planned, but the coat rack is finished and mounted. With the bench  and coat rack our mud room is now complete.


Tuesday, April 17, 2012

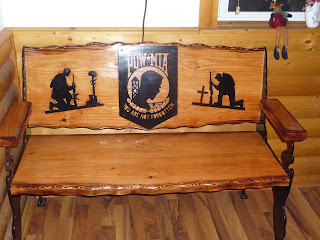
Military Honor Bench

  Wow, what a wonderful bench.  This bench was made by my friend Todd and his wife Judy. Todd is a metal Fabricator, so doing the metal work was a breeze for him. His neighbor did the router work on the wood to inset the metal soldiers.

  The 2 soldiers and the  POW-MIA symbol are made out of steel. They were cut on a High Definition Plasma table. They were then cleaned, and painted black. ( I believe Judy does all the painting and finishing work.)


This bench is proudly displayed in the entry way at Todd and Judy's home

Todd is also a proud Army Veteran.


Thursday, April 12, 2012

Rustic X Bench

  Tracy and I needed a small bench in the mud room, I made an X bench so we would have a place to sit while taking our shoes off. 


  I received a pocket hole jig for Christmas and this was a great chance to use it. Pocket holes are a great way to hide the screws. They are also one of the easiest and strongest joints you can make.


  I put a 5 degree taper on the legs to give a nice base with plenty of support.


  With a router I put a nice edge on the seat of our bench


  All that was left to do was sand and finish the bench, I put 2 coats of Minwax one step stain and polyurethane. Here are some additional pictures.


  Here are the dimensions of the bench, I used the plans from Ana White.

This is the finished bench 


Below is the picture from the Pottery Barn web site,  Rustic bench that sells for $129.00.

I made my bench for less than $20.00


Sunday, April 8, 2012

Counter Top Transformation

Check out the difference that $70.00 and a weekend has made in my son Matt and his wife Brooke's kitchen.


I was very impressed with the counters at Matt and Brooke's house. This transformation was completely done by my daughter - in-law Brooke.  Instead of buying new counter-tops they resurfaced the tops they had.

Tracy had read about a product called Giani Granite that would make plain counter-tops look like granite, knowing that Brooke wanted to redo their kitchen she told Brooke about it.

Brooke and Matt found the product at their local Walmart for $70.00
1st Step:  Brooke applied the a coat of the black base to the entire counter and let it dry overnight

2nd Step: There are 3 different colors that need to be applied in 3ft square areas until the entire counter-top is covered. Allowing each color to dry before adding the next color.


This is what it looked like when all colors were applied and dry.


3 rd Step:  There is a clear coat to add over the entire counter-top as the final step. It needs to dry for 8 hours prior to sitting anything onto the counter. It will take about 7 days for the clear coat to be fully cured.


What an unbelievable change in their kitchen for only $70.00 and a weekend of time. Very Proud of the job they have done. I guess the next generation of DIY has begun.


Tuesday, February 7, 2012

Dresser

 Above is a picture of the Ashby Tall Dresser from Pottery Bar.  Cost $1099.00


My wife Tracy and I wanted a dresser like this for one of the bedrooms in the new house. Well Tracy went to work looking for one on Craigslist and E Bay ( She is the best at hunting down a bargain). After only one day she found an add for a solid wood dresser for sale in our area. When I came home from work she let me know there was a project in the back of her vehicle for me.

I was very impressed with what she had found. This was a serious solid wood dresser. With me having a couple of days off prior to our trip to Cabo (and Tracy needing me out of her hair while she finished all the details needed for the trip) I started on this right away.

The dresser had never been finished, it was just raw wood. This was a plus for me because no stripping was needed. Just a little light sanding is all it required for prep work.


Tracy, as the main decorator, had decided that the dresser should be black. She had picked out some Krylon Satin Black paint.  


I discovered that the knobs did not match. After a quick trip to Menards the dresser was complete.

Total cost of our dresser  $65.00


This is our dresser and the Pottery Barn dresser
Pretty Big Bargain!!


Sunday, January 15, 2012

Children's Book Shelf

As I am still waiting for my house to be finished up and having most all of my stuff packed away, I wanted to share a plan I got from the Ana White site. This is a very simple but nice looking book Shelf. Don't be afraid to give it a try.


DIY Version Children's Book Shelf

This is a picture from Pottery Barn Kids Collection
Madison 4 - Shelve Bookrack
Sale Price $129.00

Shopping List:
1 – 12′ 1×6 Board (cut sides out of this board)   1 – 8′ 1×6 Board (cut shelves out of this board)
3 – 1×2 Boards
40″ of 3 1/4″ Base Moulding, between 1/2″ and 1″ thick

Cut List:
2 – 1×6 @ 57″ (Sides, Top Cut out in step 1) 4 – 1×6 @ 22 1/2″ (Shelves)
11 – 1×2 @ 22 1/2″  (Back Supports and Front Rails)
3 1/4″ Base Moulding, mitered for footer


Step 1.

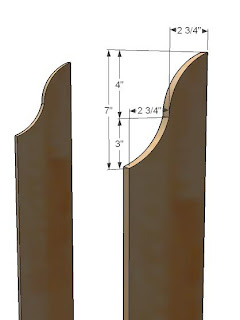
Side cut outs. Using the measurements above to guide you, cut out the sides at the top as 
shown above. Once one side is cutout to your satisfaction, use it as a pattern for the other
 side. This will keep the side the same. Use either a bandsaw or a jigsaw.


Step 2
Box. Build the box by using 2″ screws and fastening the shelves to the sides, as shown above.
Measurements above are to the bottoms of the shelves.


Step 3
Back Supports. Fasten the back supports to the sides and the shelves. Make sure
 the bookrack is square before this step. Use 2″ screws and glue.


Step 4
Front Rails. Cut out 4 of the front rails (1×2 @ 22 1/2″) in a simple arch shape above as shown
 in red. Then, as you did the back supports, fasten the front rails in place. Make sure
 your bookrack  is square before fastening the rails, as this step will set the bookrack.


Step 5
Footer. Using 3 1/4″ store bought base moulding, cut your footer with the outside corners
 mitered at 45 degrees. Preferred fastening method is to use 1 1/4″ brad nails, but you can
 also use a couple of screws and wood glue (or a good ole hammer and nails).
 Dimensions are not given because your moulding could be any thickness.


Step 6
Finishing. Fill any holes with wood filler and sand and finish as desired. Screw through
 the back supports into a stud in the wall to keep the bookrack in place.
 You  could alternatively  use a picture hanging kit to fasten the bookrack to the wall.