Tuesday, February 7, 2012

Dresser

 Above is a picture of the Ashby Tall Dresser from Pottery Bar.  Cost $1099.00


My wife Tracy and I wanted a dresser like this for one of the bedrooms in the new house. Well Tracy went to work looking for one on Craigslist and E Bay ( She is the best at hunting down a bargain). After only one day she found an add for a solid wood dresser for sale in our area. When I came home from work she let me know there was a project in the back of her vehicle for me.

I was very impressed with what she had found. This was a serious solid wood dresser. With me having a couple of days off prior to our trip to Cabo (and Tracy needing me out of her hair while she finished all the details needed for the trip) I started on this right away.

The dresser had never been finished, it was just raw wood. This was a plus for me because no stripping was needed. Just a little light sanding is all it required for prep work.


Tracy, as the main decorator, had decided that the dresser should be black. She had picked out some Krylon Satin Black paint.  


I discovered that the knobs did not match. After a quick trip to Menards the dresser was complete.

Total cost of our dresser  $65.00


This is our dresser and the Pottery Barn dresser
Pretty Big Bargain!!


Sunday, January 15, 2012

Children's Book Shelf

As I am still waiting for my house to be finished up and having most all of my stuff packed away, I wanted to share a plan I got from the Ana White site. This is a very simple but nice looking book Shelf. Don't be afraid to give it a try.


DIY Version Children's Book Shelf

This is a picture from Pottery Barn Kids Collection
Madison 4 - Shelve Bookrack
Sale Price $129.00

Shopping List:
1 – 12′ 1×6 Board (cut sides out of this board)   1 – 8′ 1×6 Board (cut shelves out of this board)
3 – 1×2 Boards
40″ of 3 1/4″ Base Moulding, between 1/2″ and 1″ thick

Cut List:
2 – 1×6 @ 57″ (Sides, Top Cut out in step 1) 4 – 1×6 @ 22 1/2″ (Shelves)
11 – 1×2 @ 22 1/2″  (Back Supports and Front Rails)
3 1/4″ Base Moulding, mitered for footer


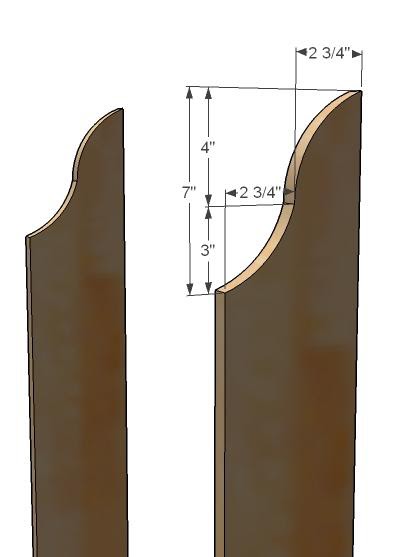
Step 1.

Side cut outs. Using the measurements above to guide you, cut out the sides at the top as 
shown above. Once one side is cutout to your satisfaction, use it as a pattern for the other
 side. This will keep the side the same. Use either a bandsaw or a jigsaw.


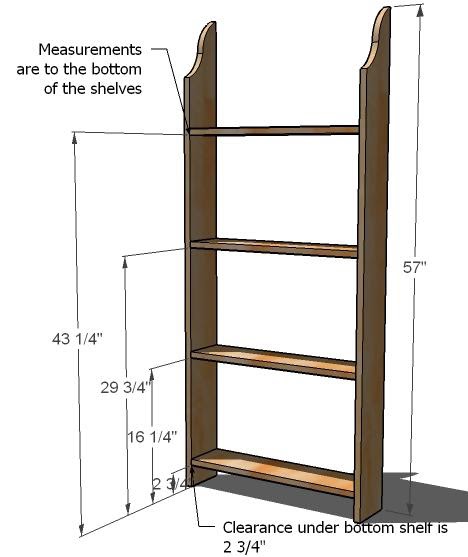
Step 2
Box. Build the box by using 2″ screws and fastening the shelves to the sides, as shown above.
Measurements above are to the bottoms of the shelves.


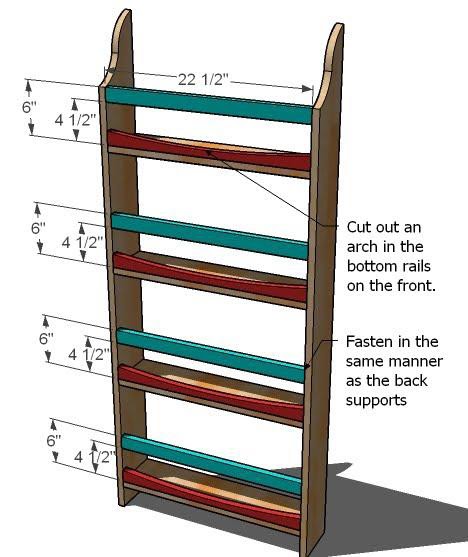
Step 3
Back Supports. Fasten the back supports to the sides and the shelves. Make sure
 the bookrack is square before this step. Use 2″ screws and glue.


Step 4
Front Rails. Cut out 4 of the front rails (1×2 @ 22 1/2″) in a simple arch shape above as shown
 in red. Then, as you did the back supports, fasten the front rails in place. Make sure
 your bookrack  is square before fastening the rails, as this step will set the bookrack.


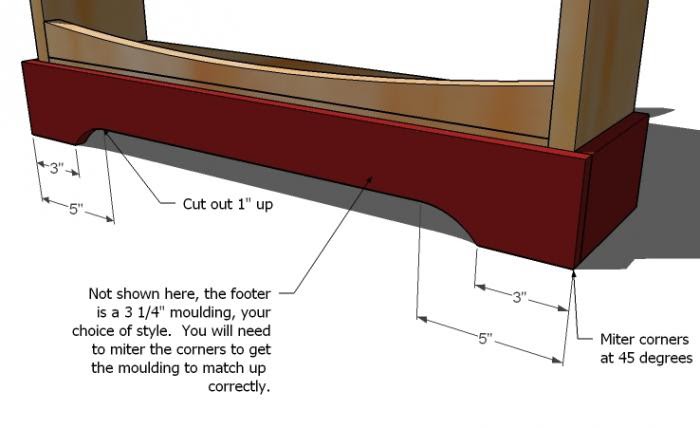
Step 5
Footer. Using 3 1/4″ store bought base moulding, cut your footer with the outside corners
 mitered at 45 degrees. Preferred fastening method is to use 1 1/4″ brad nails, but you can
 also use a couple of screws and wood glue (or a good ole hammer and nails).
 Dimensions are not given because your moulding could be any thickness.


Step 6
Finishing. Fill any holes with wood filler and sand and finish as desired. Screw through
 the back supports into a stud in the wall to keep the bookrack in place.
 You  could alternatively  use a picture hanging kit to fasten the bookrack to the wall.


Thursday, December 29, 2011

First Construction Project

After telling my wife and kids for 16yrs that we would put a bathroom in the basement, I finally got that project done after the boys had moved out.
I picked a spot in what used to be our laundry/utility room. As you can see it was a pretty dark and dingy corner.
  I decided to put my toilet up off the floor, in order to both save money and avoid cutting the basement floor.  I started with a small sub floor  4ft X 8ft.
The toilet was raise to 24" from the floor, this allowed for proper flow in the sewer  I connected into. With it being so high I added a step in front of it. The toilet platform is 4ft X 4ft.

 I put in a wall mounted sink to save on money and room. The medicine cabinet was bought at a thrift store for $2.00.

My Dad and I went to Menards and picked up this door. The door was in the return goods area and marked at $30.00. Well Dad and I found a sales person and ask if they would take 15 for the door. The guy took out a marker and lowered it to $15.00 right then. We had a great time that day.


Here are a few pictures of when I was finished with it. All the decorating was done by my wonderful wife Tracy


I almost forgot that Tracy let me pick out the paint color, and the Pirates Theme. Making it a real man's bathroom.

I put this entire bathroom in for around $300.00.

Wednesday, December 28, 2011

Wood Working Vise

I saw this vise for under the work bench on line for $179.00  Well that would not do for me!!

I made my own vise for $25.00, For That price I went ahead and made a set of them. The only thing I wish I would have spent the extra money and used Acme All Thread instead of standard thread. This just means I have to crank it a few extra times.


Now I must admit that I have access to a lathe and mill, which made this quite easy for me to make. Main body of my vises are made from aluminum.  The handles and slide rods are made from cold roll steel
I made the slide device removable in case I ever need to replace the threaded rod.
 I will have to just put these away for a little while as of right now I don't have a shop to work in. Looks like that will be in Feb. Then I'm sure they will be great mounted under my work bench.

Monday, December 26, 2011

One of my 1st projects

  As I'm just getting started here is one of the first Christmas presents I made. My wife had a bench out in the yard with the Amish couple on it. The bench started to fall apart from the Iowa winters. As I was taking the garbage out one morning I saw the broken bench and the Amish couple in the trash. Well this gave me the idea for a Christmas present. I took the couple out of the trash and hid them away. I made the little bench and glued the couple on to it. This made for a great and sentimental present that she loved.

Sunday, December 25, 2011

Getting Started

  This is my first post,  We will be talking about things that we can build ourselves instead of buying them. In these economic times everyone has items they need or just want.  Why not build these items at a much lower cost than retailers will sell them for. I have built presents for my family, special tools, exercise equipment, furniture, and storage spaces. Why pay $500 dollars for an Item that you can build yourself  for $200 or even $50 for an item that you could build for $20.